
Collector System
From FlyFF WIki
This article has been certified complete as of version 13. Any errors should be reported here.
Version 11 of Flyff introduces a new Collector system in which you can use collectors in certain areas to gather pieces of items which can be combined into the actual items.
Contents |
Getting Started
Collector
Collectors can be purchased from (Collecting Manager) Collins at any collecting area for 1,000,000 penya. The collector sold at all collecting areas is the same, so it does not matter where you buy it, as there's only one type of collector. You must be level 15 or higher to use a collector.
Battery
Collectors require a battery to be used before you can start collecting. There are three types of batteries. To use a battery, first equip your collector, and then double click on the battery. Collecting will stop automatically when the battery runs out.
| Battery Type | Description |
|---|---|
| Purchased from (Collecting Manager) Collins for 70,000 penya. Lasts 30 minutes and does not count down when your collector is not in use. Note that when using this battery, it will only fill the meter up to 1800 seconds, regardless of whether you still have battery power left. | |
| Recieved in event bags. Lasts 1 real-time days once used, whether collecting or not. | |
| Purchased from the Cash Shop. Lasts 10 real-time days once used, whether collecting or not. | |
| Purchased from the Cash Shop. Lasts 20 real-time days once used, whether collecting or not. | |
| Purchased from the Cash Shop. Lasts 1 real-time day once used, whether collecting or not. |
Collecting
Locations
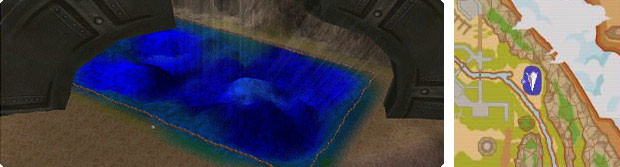
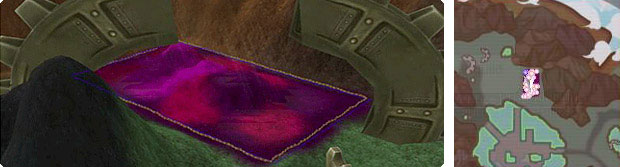
The following are the three locations where you can use your collector to collect item pieces. Collecting can only be done within these designated areas.
| South of Flarine City |
|---|

|
| East of Sain City |
|
| North of Darken City |
|
Using the Collector
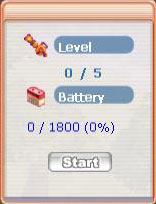
Once you've charged your collector with a battery, you're ready to start using it. Go to any of the 3 collecting locations and with your collector equipped, you should see the Collector Window (pictured right). This window shows you the level of your collector, and how much battery time it has left, if using a normal battery. Gold and Silver Batteries will display the remaining time at the top of your screen, and not in the collector window.
To begin collecting, make sure you're standing inside the fenced, colored collector area and press the start button in the collector window. You should see the collecting animation begin, and a green bar appear over your character's head that will slowly fill up yellow. This bar represents how long until you find the next item piece. Every time it fills up, you find a piece, and then it starts filling again. The higher the level of your collector, the faster the bar will fill up. More information regarding that is in the Upgrading section.
Item Pieces
The following table lists all the item pieces you can find while collecting. The pieces you will find are completely random, with some being rarer than others. When you find 10 of the same piece, you can take the pieces to (Collecting Manager) Collins and he will exchange them for the item that the pieces combine into. Note the percent chances of receiving are to be used as a guideline not an exact. Results may vary, These results were gathered using a +5 collector and all types of batteries.
Battery, Bronze Battery, Silver Battery & Gold Battery Collecting List
| Item Piece | % chance | Exchange 10 Pieces to Receive |
|---|---|---|
| 8.868765561 | ||
| 11.48903703 | ||
| 9.131796643 | ||
| 9.041442454 | ||
| 10.42687334 | ||
| 0.038149546 | ||
| 5.371054534 | ||
| 0.098385672 | ||
| 0.012047225 | ||
| 5.435306401 | ||
| 0.020078709 | ||
| 2.839129387 | ||
| 0.02409445 | ||
| 0.008031483 | ||
| 2.770861778 | ||
| 0.56421171 | ||
| 0.582282548 | ||
| 0.905549755 | ||
| 0.425668621 | ||
| 0.200787085 | ||
| 0.032125934 | ||
| 0.02409445 | ||
| 0.114448639 | ||
| 16.49867481 | Can not be exchanged, sell to NPC. | |
| 9.017348004 | Can not be exchanged, sell to NPC. | |
| 2.543972372 | Whole item, no need to exchange. | |
| 1.608304554 | Whole item, no need to exchange. | |
| 1.375391535 | Whole item, no need to exchange. | |
| 1.375391535 | Whole item, no need to exchange. | |
| 0.200787085 | Whole item, no need to exchange. | |
Premium Battery Collecting List
| Item Piece | Exchange 10 Pieces to Receive |
|---|---|
| Whole item, no need to exchange. | |
| Whole item, no need to exchange. | |
| Whole item, no need to exchange. | |
| Whole item, no need to exchange. | |
| Whole item, no need to exchange. | |
| Whole item, no need to exchange. | |
| Whole item, no need to exchange. | |
| Whole item, no need to exchange. | |
| Whole item, no need to exchange. | |
| Whole item, no need to exchange. | |
| Whole item, no need to exchange. | |
| Whole item, no need to exchange. | |
| Whole item, no need to exchange. | |
| Whole item, no need to exchange. | |
| Whole item, no need to exchange. | |
Upgrading
Collectors can be upgraded up to +5 by using Moonstones on them for increased collecting speed. To upgrade your collector simply double click a Moonstone and then click on the collector (Make sure it is unequipped first). If it succeeds, the collector will gain one level. If it fails, it will not be upgraded, and you must try again if you wish to upgrade it. Upgrading a collector will not destroy it if it fails. Only the moonstone will be lost in an upgrade failure.
| Upgrade Level | Time to Collect 1 Item Piece |
|---|---|
| +0 | 105 seconds |
| +1 | 90 seconds |
| +2 | 75 seconds |
| +3 | 60 seconds |
| +4 | 45 seconds |
| +5 | 30 seconds |

