New Player Guide
From FlyFF WIki
Before game play is even attempted, it is necessary to create an account. You can click the ![]() button on the Webzen.com homepage. It is very important that you fill out the correct information, not only to make your account usable, but also due to any problems that might occur in the future (such as lost passwords).
button on the Webzen.com homepage. It is very important that you fill out the correct information, not only to make your account usable, but also due to any problems that might occur in the future (such as lost passwords).
Contents |
Accessing the Game
Login Screen
After running the patcher, click the "Play" button. This will open up the GameGuard patcher. It helps prevent things such as hacking, cheating, and so on. This screen will take a variable amount of time to get past, depending on connection speed. (Once it downloads the first time, until it is updated again, its load time decreases significantly.)
The login screen allows you to access your account (and their associated characters) and the game itself.- The account field is where the name, selected at registry, is put. This is also e-mailed to the e-mail provided in the registration.
- The password field is the password, chosen by the user. There are no automated passwords. Make sure to write the password down, it is not e-mailed in the verification e-mail.
It is very important to make sure the account is activated, or upon logging in, it will claim it does not exist.
Other than the Login button, there are several other buttons.
About Flyff gives information such as current version, and copyrights of the game.
Story tells the background story of the game, in chapters, to make the game flow a little bit easier.
Quit closes the game client completely.
Clusters and Channels
Once you log-in, you'll be taken to the Select Server window. Here, you will find a list of available Clusters (or Worlds) that are available for play. Each Cluster is a separate world where your characters will live. Once a cluster is chosen, a channel can be chosen. Currently there is only one cluster that allows world PvP, and it's marked with (PK) after the cluster name.
It is very important to note that, when selecting a server to create your character on, this character will only be accessible on this server. You are allowed 3 characters per cluster per account. If a player wishes to switch clusters, they must start over. Additionally, all items (including cash shop), are not capable of being transferred. Please do not e-mail asking for items to be moved, the request will be denied. Characters will not be switched upon asking.
Channels however, can be switched as frequently as the player wants. When switching, all items remain where they were, there are no penalties.
Once a Cluster and Channel are chosen, hit the Next button to continue.
Character Creation
| Upon logging in, for the first time, there will be three open slots for brand-new characters. Just click on one of the slots and then click "Create" to begin personalizing your very own character. | |
The character creation window is very simple. Just follow these four simple steps:
| |
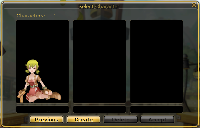
| After you click Ok, it will return you to your account window, where it will show your newly created character. This character will always be in the selected slot. | |
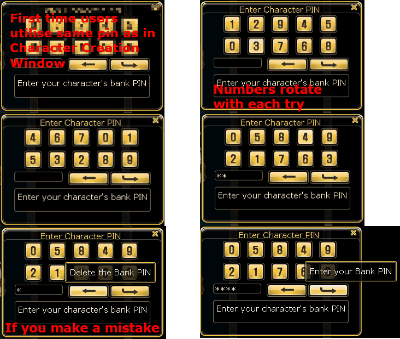
| To start playing, click on a character and click the Accept button. This will open the pin window. The order of the numbers are random. Enter the bank pin you used in Character Creation Window. It will log that character onto the game. | |
| To Delete Your Character- At the character selection window, select the character that you wish to delete and press Delete. While characters can be restored, their banks will be cleared. Please do not delete characters just to ask them to be restored. Note: This option has been disabled. |
First Step into the FlyFF World
The first time a character logs on, it will be asked if it wants to follow the guide. The guide is a small penguin in the corner of the screen. This penguin, named Pang, helps teach players how to do things in the game. You can switch off this guide if you wish as everything will be reiterated here, however it is recommended that you keep it for your very first character.
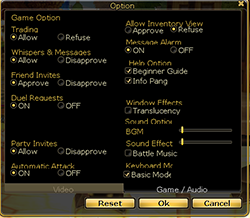
Adjusting Your Options
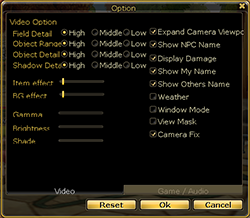
To access your Options Window, just click on Menu [bottom left] and select Options [2nd from the bottom]
| Setting | Description | Recommendation |
|---|---|---|
| Video Option - Field Detail | Adjusts how much detail the landscape will have. | Low |
| Video Option - Object Range | Adjusts how far away an object will appear on your screen. | Low |
| Video Option - Object Detail | Adjusts how much detail the landscape will have. | Low |
| Video Option - Shadow Detail | Adjusts how much detail the shadows will have. | Low |
| Video Option - Item Effect | A special effect that slightly blurs and lightens the graphics | Off |
| Video Option - BG Effect | No Effect as of Right now | On or Off |
| Video Option - Expand Camera Viewpoint | Enables to zoom further in or out. | Preference |
| Video Option - Show NPC Name | Allows you to view the names of NPCs, including monsters and pets. | Checked |
| Video Option - Display Damage | Allows you to see the damage dealt by other players and by monsters to other players. | Checked |
| Video Option - Show My Name | Allows you to view your name and HP bar. | Checked |
| Video Option - Show Others Name | Allows you to view the names of other characters | Checked |
| Video Option - Weather | Enables you to see the weather in Mardrigal | Preference |
| Video Option - Window Mode | Brings you out of Full-Screen Mode, and allows you to play FlyFF while viewing other applications. You have to restart FlyFF to activate a change. | Preference |
| Video Option - Camera Fix | Fixing the camera causes your view to follow your character as s/he turns. | Unchecked |
| Setting | Description | Recommendation |
|---|---|---|
| Game Option - Trading | On Refuse, players attempting to trade you will automatically be rejected. | Approve |
| Game Option - Whispers & Messages | On Refuse, players attempting to whisper or private message you will automatically be rejected. | Approve |
| Game Option - Friend Invites | On Refuse, players attempting to add you to their messenger list will automatically be rejected. | Approve |
| Game Option - Duel Requests | On Refuse, players requests to duel you will be automatically rejected. Read more about PvP and Duels PvP. Further explanations will also follow in this guide. | Approve |
| Game Option - Party Invites | On Refuse, players attempting to join you to a party will automatically be rejected. | Approve |
| Game Option - Automatic Attack | When turned on, it allows you to attack a monster continuously with two clicks. Further information will be in Combat and the Leveling As A Vagrant section of this guide. | On |
| Game Option - Allow Inventory View | On Approve, allows players to view your character's equipment. | Preference |
| Game Option - Message Alarm | When turned on, you will be alerted when a player on your messenger comes Online. | On |
| Help Option - Beginner Guide | This option when used brings up random tips by [Help] every so often. There are options to change where these tips show up. | Checked |
| Help Option - Info Pang | Shows Pang at the bottom right of your screen. | Checked |
| Window Effects - Translucency | Makes windows on your screen semi-transparent. | Unchecked |
| Sound Option - BGM | Most areas of the FlyFFWorld has its own customized music that will play when you fight. There is also music for flying. Many players highly enjoy the FlyFF BGM's. | Preference |
| Sound Options - Sound Effect | All spell and fighting sounds are considered Sound Effect. This also includes sounds made by monsters and your character. | Preference |
| Sound Options - Battle Music | Enables to play different background music when battling a mob. This is only effect when the BGM is turned on. | Preference |
| Keyboard Mode - Basic Mode | Enables walking backwards when ticked. | Preference |
Getting Acquainted with the Interface
The interface is very user-friendly. It is comprised of a short-cut bar, messaging box, and various windows that can be toggled with shortcut keys to access game features.
Short-Cut Bar

The short-cut bar is split into 4 sections. (View the interface at the right for reference).
- The section to the left - is a click-bar. You can place equipment, items, and skills into each slot, distinguished by the dot. To equip or use the items, just click on them once.
- The section in the middle - is your F-key bars. There's a total of 3 bars available, and you can switch between them by pressing ` on your keyboard. Essentially this bar works exactly like the click-bar, however this time your slots are associated with an F-key indicated right above the slot. This means easier access. Many players use these bars for often used items and skills.
- The section to the right - is your character status. Here you can see your HP, MP and FP.
- The section to the far right - is your Action Slot. This is used only for skills with no cool-down (further explanation of cool-downs in Leveling as a First-Class). By using the action slot, your skills will be cast in succession faster than their normal casting rate. The maximum amount of skills you can put in it is 6. However, the action slot has a cool-down. The more you use it, the more area becomes greyed out. The greyed out skills cannot be used at all. Thus, usually it is recommended to not have 6 skills in the action slot unless you have an Activition Scroll. Note that you can also place the "S" icon into a a click-slot or F-slot to use the action slot that way. The Action Slot can also be used if you press "C" on the keyboard when you aren't chatting.
Messaging Box
The message box is your primary tool to really interact with players. To use the message box, just press enter and a cursor will appear in the text field. While you can use the message box for various in-game functions, we will just concentrate on communication in this section.
There are essentially 5 available chatting channels. Each channel has its own colored font, and using the filtering options you can choose which channels you wish to view and talk in. To switch between the channels, just click the icons above the typing field. Additionally, you can still input messages into other channels with the use of certain commands (listed below) which you place before your message. While you are in a particular channel the command is automatically inputted for you when you enter into the text field.
|
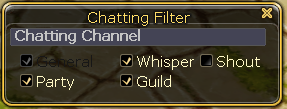
To adjust the filters of any particular channel, just select that channel and press the button Filter at the right side of the box.
- Chatting Channel - Here, check box the channels that you want to be able to read in this particular channel. Notice that you cannot un-check the original channel that you are adjusting the filter for. (ie. In the Chat channel, you cannot General (or public chat) is greyed out.
Accessing other Game Features/Windows
All game features on FlyFF are accessible via the Start Menu, and most are accessible via Hot Keys. Please view the Hot Key page for information about the windows accessible with this method.
The Menu button is on the bottom left-hand corner of your FlyFF Interface. All items in the listing with a letter on the right hand side are available by Hot Key. We will only be talking about the ones not available by Hot Key in this section.
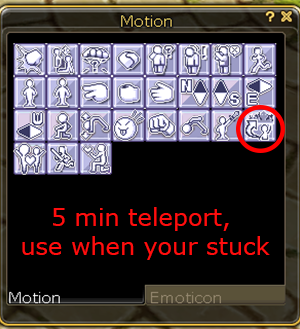
Moving Around
After you learn to move, you can start learning to fight. Visit the Combat page to learn how to fight against monsters. Killing monsters gives you experience, which allows for leveling
The Geography of the FlyFF World
The city your character first starts in is called Flaris. The large light is called a Lodestar.
Leveling as a Vagrant
The first monsters many people fight are Aibatts. As you level, you can insert points into the Character Stat window. This is accessable by hitting H.
Level 1-15 Guide and Choosing the right class are good guides to look at.
There are many Hot Keys players can use to increase, and monitor game play. Click, or search Hot Keys to view this list.


